
Techniques, strategies and recipes for building a modern web app with multiple teams that can ship features independently.
What are Micro Frontends?
The term Micro Frontends first came up in ThoughtWorks Technology Radar at the end of 2016. It extends the concepts of micro services to the frontend world. The current trend is to build a feature-rich and powerful browser application, aka single page app, which sits on top of a micro service architecture. Over time the frontend layer, often developed by a separate team, grows and gets more difficult to maintain. That’s what we call a Frontend Monolith.
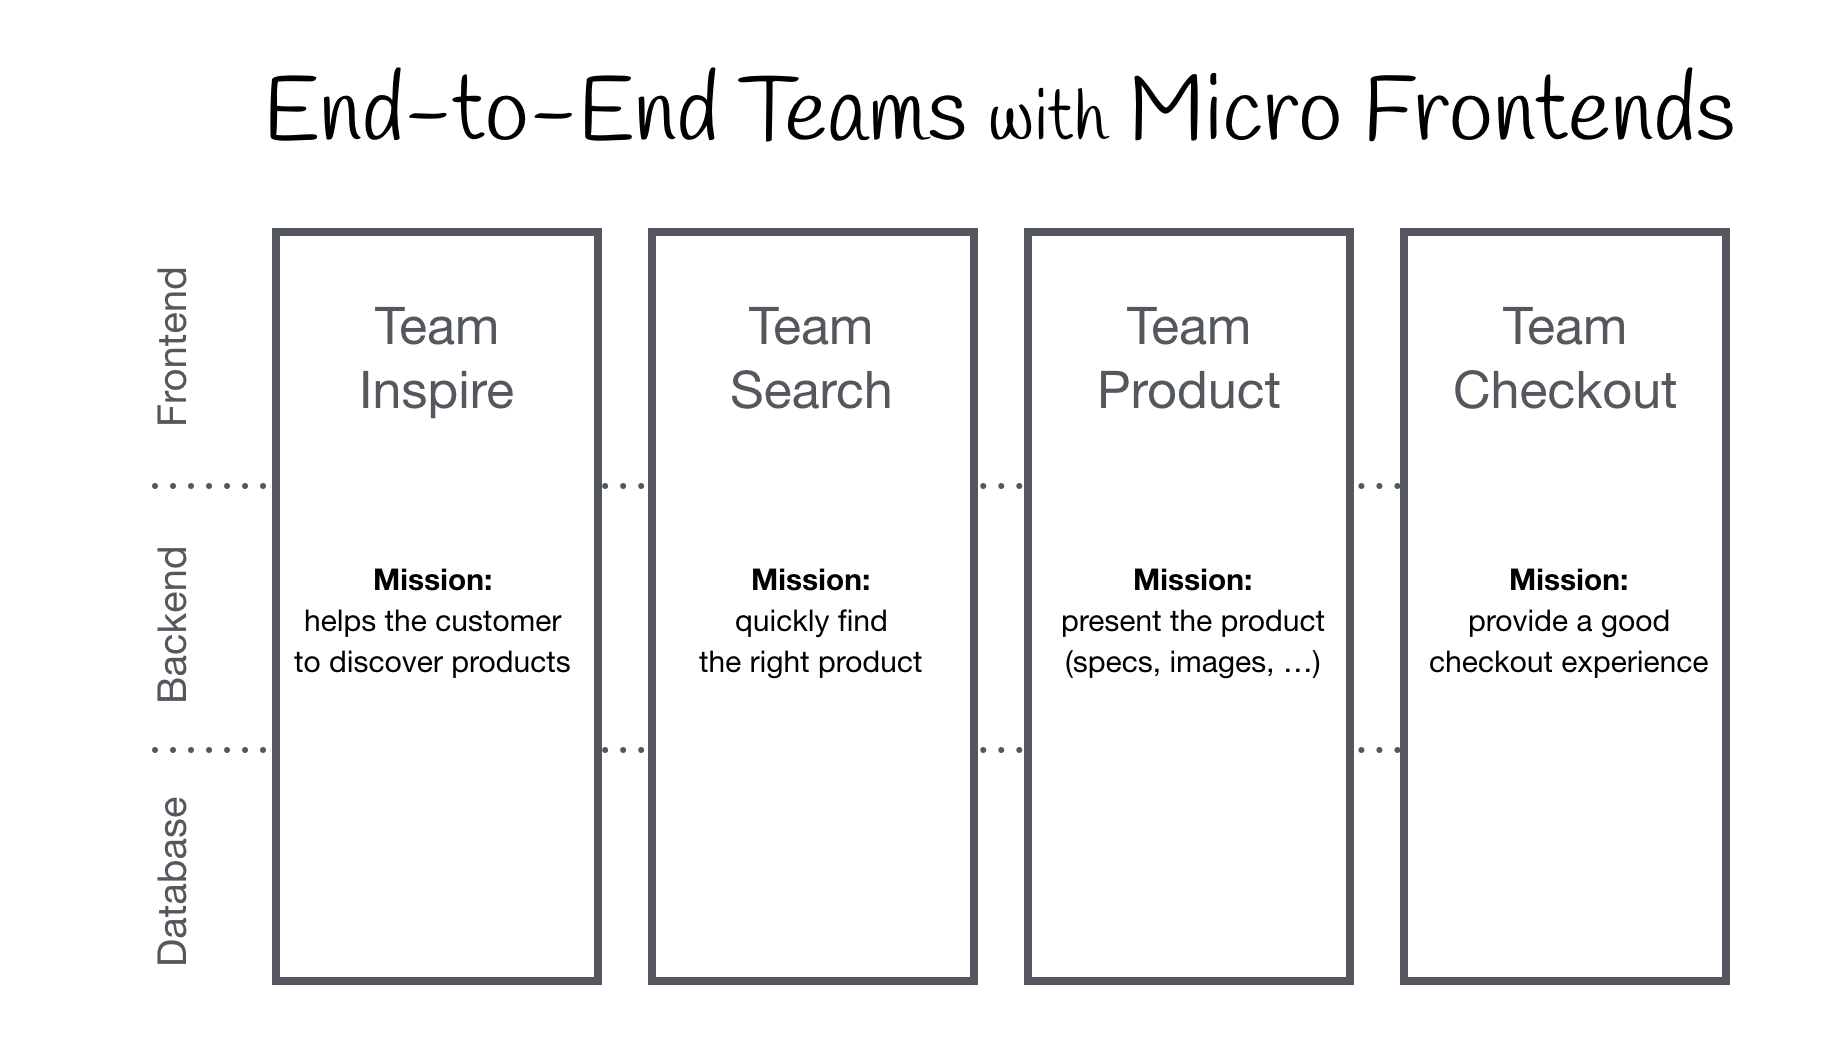
The idea behind Micro Frontends is to think about a website or web app as a composition of features which are owned by independent teams. Each team has a distinct area of business or mission it cares about and specialises in. A team is cross functional and develops its features end-to-end, from database to user interface.
However, this idea is not new. It has a lot in common with the Self-contained Systems concept. In the past approaches like this went by the name of Frontend Integration for Verticalised Systems. But Micro Frontends is clearly a more friendly and less bulky term.
Monolithic Frontends

Organisation in Verticals
What’s a Modern Web App?
In the introduction I’ve used the phrase “building a modern web app”. Let’s define the assumptions that are connected with this term.
To put this into a broader perspective, Aral Balkan has written a blog post about what he calls the Documents‐to‐Applications Continuum. He comes up with the concept of a sliding scale where a site, built out of static documents, connected via links, is on the left end and a pure behaviour driven, contentless application like an online photo editor is on the right.
If you would position your project on the left side of this spectrum, an integration on webserver level is a good fit. With this model a server collects and concatenates HTML strings from all components that make up the page requested by the user. Updates are done by reloading the page from the server or replacing parts of it via ajax. Gustaf Nilsson Kotte has written a comprehensive article on this topic.
When your user interface has to provide instant feedback, even on unreliable connections, a pure server rendered site is not sufficient anymore. To implement techniques like Optimistic UI or Skeleton Screens you need to be able to also update your UI on the device itself. Google’s term Progressive Web Apps aptly describes the balancing act of being a good citizen of the web (progressive enhancement) while also providing app-like performance. This kind of application is located somewhere around the middle of the site-app-continuum. Here a solely server based solution is not sufficient anymore. We have to move the integration into the browser, and this is the focus of this article.
Core Ideas behind Micro Frontends
- Be Technology Agnostic
Each team should be able to choose and upgrade their stack without having to coordinate with other teams. Custom Elements are a great way to hide implementation details while providing a neutral interface to others. - Isolate Team Code
Don’t share a runtime, even if all teams use the same framework. Build independent apps that are self contained. Don’t rely on shared state or global variables. - Establish Team Prefixes
Agree on naming conventions where isolation is not possible yet. Namespace CSS, Events, Local Storage and Cookies to avoid collisions and clarify ownership. - Favor Native Browser Features over Custom APIs
Use Browser Events for communication instead of building a global PubSub system. If you really have to build a cross-team API, try keeping it as simple as possible. - Build a Resilient Site
Your feature should be useful, even if JavaScript failed or hasn’t executed yet. Use Universal Rendering and Progressive Enhancement to improve perceived performance.
The DOM is the API
Custom Elements, the interoperability aspect from the Web Components Spec, are a good primitive for integration in the browser. Each team builds their component using their web technology of choice and wraps it inside a Custom Element (e.g. <order-minicart></order-minicart>). The DOM specification of this particular element (tag-name, attributes & events) acts as the contract or public API for other teams. The advantage is that they can use the component and its functionality without having to know the implementation. They just have to be able to interact with the DOM.
But Custom Elements alone are not the solution to all our needs. To address progressive enhancement, universal rendering or routing we need additional pieces of software.
This page is divided into two main areas. First we will discuss Page Composition - how to assemble a page out of components owned by different teams. After that we’ll show examples for implementing client-side Page Transition.
Page Composition
Beside the client- and server-side integration of code written in different frameworks itself, there are a lot of side topics that should be discussed: mechanisms to isolate js, avoid css conflicts, load resources as needed, share common resources between teams, handle data fetching and think about good loading states for the user. We’ll go into these topics one step at a time.
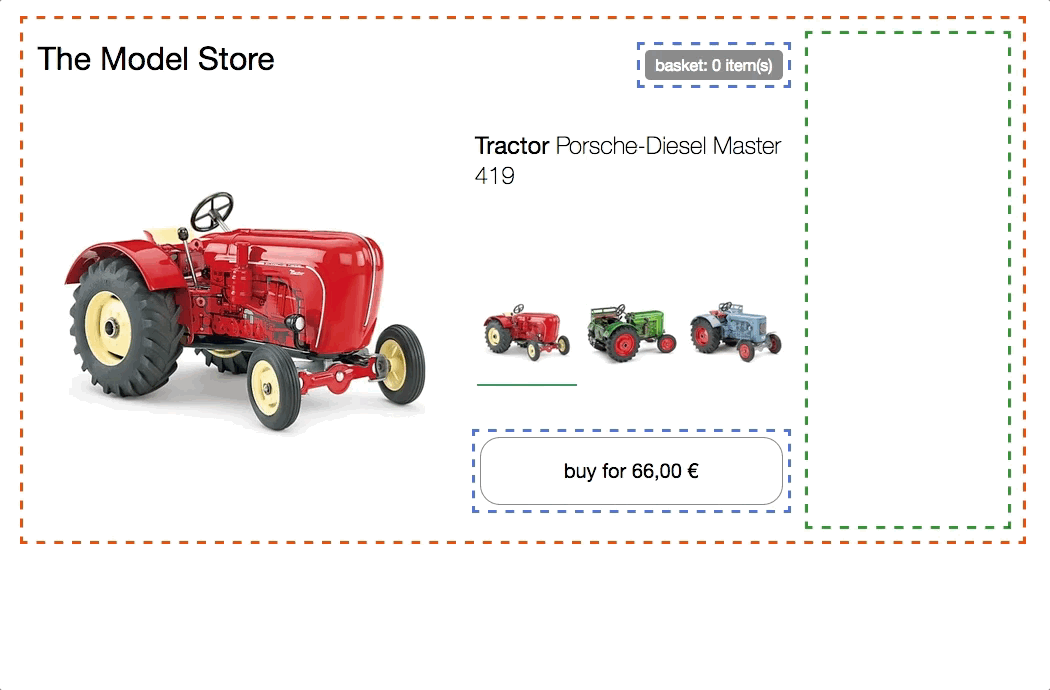
The Base Prototype
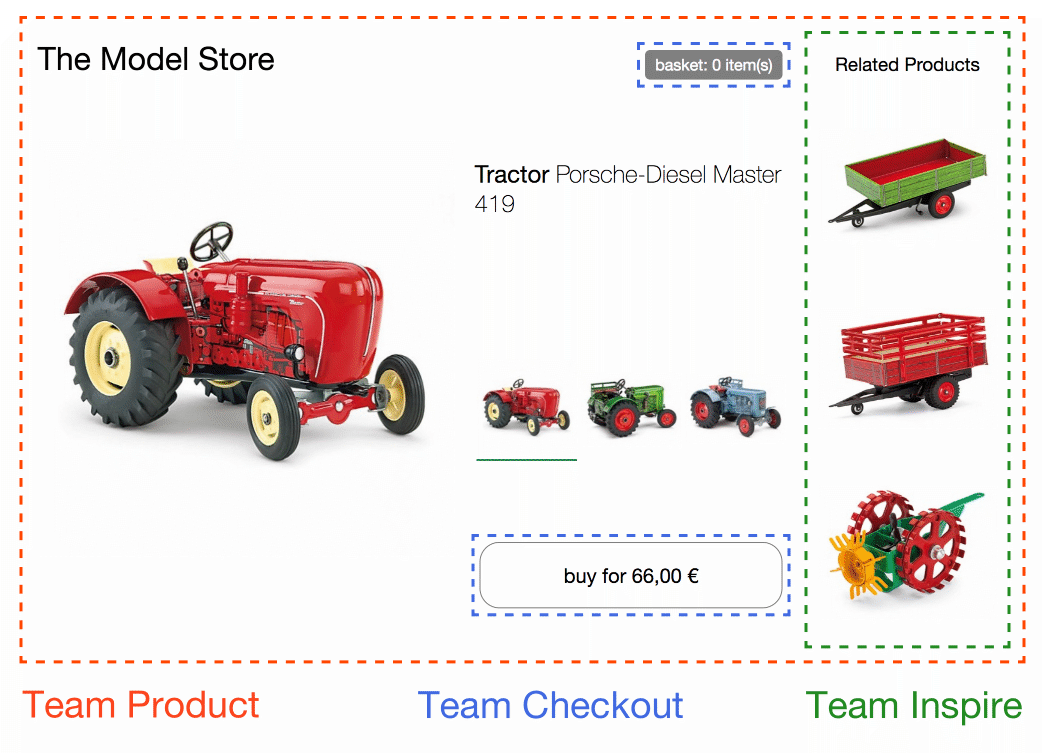
The product page of this model tractor store will serve as the basis for the following examples.
It features a variant selector to switch between the three different tractor models. On change product image, name, price and recommendations are updated. There is also a buy button, which adds the selected variant to the basket and a mini basket at the top that updates accordingly.

try in browser & inspect the code
All HTML is generated client side using plain JavaScript and ES6 Template Strings with no dependencies. The code uses a simple state/markup separation and re-renders the entire HTML client side on every change - no fancy DOM diffing and no universal rendering for now. Also no team separation - the code is written in one js/css file.
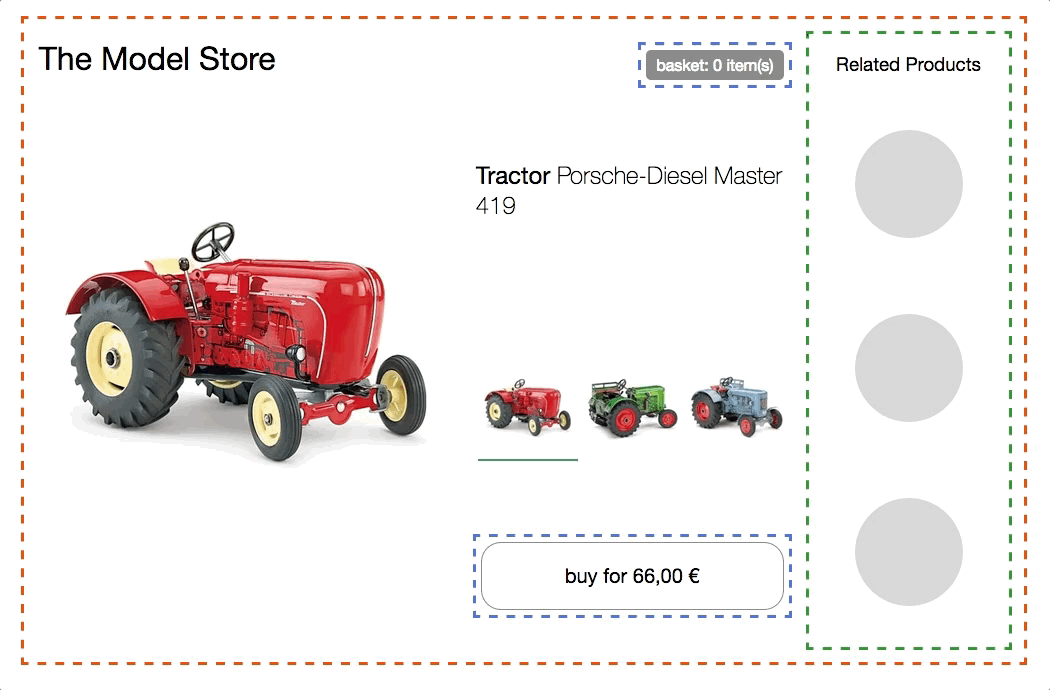
Client-side Integration
In this example, the page is split into separate components/fragments owned by three teams. Team Checkout (blue) is now responsible for everything regarding the purchasing process - namely the buy button and mini basket. Team Inspire (green) manages the product recommendations on this page. The page itself is owned by Team Product (red).
try in browser & inspect the code
Team Product decides which functionality is included and where it is positioned in the layout. The page contains information that can be provided by Team Product itself, like the product name, image and the available variants. But it also includes fragments (Custom Elements) from the other teams.
How to Create a Custom Element?
Lets take the buy button as an example. Team Product includes the button simply adding <blue-buy sku="t_porsche"></blue-buy> to the desired position in the markup. For this to work, Team Checkout has to register the element blue-buy on the page.
class BlueBuy extends HTMLElement {
  connectedCallback() {
    this.attachShadow({ mode: 'open' });
    this.shadowRoot = `<button type="button">buy for 66,00 €</button>`;
  }

  disconnectedCallback() { ... }
}
window.customElements.define('blue-buy', BlueBuy);
Now every time the browser comes across a new blue-buy tag, the connectedCallback is called. this is the reference to the root DOM node of the custom element. All properties and methods of a standard DOM element like innerHTML or getAttribute() can be used.
When naming your element the only requirement the spec defines is that the name must include a dash (-) to maintain compatibility with upcoming new HTML tags. In the upcoming examples the naming convention [team_color]-[feature] is used. The team namespace guards against collisions and this way the ownership of a feature becomes obvious, simply by looking at the DOM.
Parent-Child Communication / DOM Modification
When the user selects another tractor in the variant selector, the buy button has to be updated accordingly. To achieve this Team Product can simply remove the existing element from the DOM and insert a new one.
container.innerHTML;
// => <blue-buy sku="t_porsche">...</blue-buy>
container.innerHTML = '<blue-buy sku="t_fendt"></blue-buy>';
The disconnectedCallback of the old element gets invoked synchronously to provide the element with the chance to clean up things like event listeners. After that the connectedCallback of the newly created t_fendt element is called.
Another more performant option is to just update the sku attribute on the existing element.
document.querySelector('blue-buy').setAttribute('sku', 't_fendt');
If Team Product used a templating engine that features DOM diffing, like React, this would be done by the algorithm automatically.

To support this the Custom Element can implement the attributeChangedCallback and specify a list of observedAttributes for which this callback should be triggered.
const prices = {
  t_porsche: '66,00 €',
  t_fendt: '54,00 €',
  t_eicher: '58,00 €',
};

class BlueBuy extends HTMLElement {
  static get observedAttributes() {
    return ['sku'];
  }
  connectedCallback() {
    this.render();
  }
  render() {
    if (!this.shadowRoot) {
      this.attachShadow({ mode: 'open' });
    }
    const sku = this.getAttribute('sku');
    const price = prices[sku];
    this.shadowRoot.innerHTML = `<button type="button">buy for ${price}</button>`;
  }
  attributeChangedCallback(attr, oldValue, newValue) {
    this.render();
  }
  disconnectedCallback() {...}
}
window.customElements.define('blue-buy', BlueBuy);
To avoid duplication a render() method is introduced which is called from connectedCallback and attributeChangedCallback. This method collects needed data and innerHTML’s the new markup. When deciding to go with a more sophisticated templating engine or framework inside the Custom Element, this is the place where its initialisation code would go.
Browser Support
The above example uses the Custom Element Spec which is supported by all modern browsers. No polyfills or hacks are needed. The same is true for Shadow DOM, which is used to encapsulate the Custom Element’s markup and styles.
Framework Compatibility
Because Custom Elements are a web standard, all major JavaScript frameworks like React, Vue, Angular, Svelte or Preact support them. They allow you to embed a Custom Element in your application just like a native HTML tag, and they also provide ways to publish your framework-specific application as a Custom Element.
Avoid Framework Anarchy
Using Custom Elements is a great way to achieve a high amount of decoupling between the fragments of the individual teams. This way, each team is free to pick the frontend framework of their choice. But just because you can does not mean that it’s a wise idea to mix different technologies. Try to avoid Micro Frontends Anarchy and create a reasonable level of alignment between the various teams. This way, teams can share learning and best practices with each other. It will also make your life easier when you want to establish a central pattern library. That said, the capability of mixing technologies can be handy when you’re working with a legacy application and want to migrate to a new tech stack.
Child-Parent or Siblings Communication / DOM Events
But passing down attributes is not sufficient for all interactions. In our example the mini basket should refresh when the user performs a click on the buy button.
Both fragments are owned by Team Checkout (blue), so they could build some kind of internal JavaScript API that lets the mini basket know when the button was pressed. But this would require the component instances to know each other and would also be an isolation violation.
A cleaner way is to use a PubSub mechanism, where a component can publish a message and other components can subscribe to specific topics. Luckily browsers have this feature built-in. This is exactly how browser events like click, select or mouseover work. In addition to native events there is also the possibility to create higher level events with new CustomEvent(...). Events are always tied to the DOM node they were created/dispatched on. Most native events also feature bubbling. This makes it possible to listen for all events on a specific sub-tree of the DOM. If you want to listen to all events on the page, attach the event listener to the window element. Here is how the creation of the blue:basket:changed-event looks in the example:
class BlueBuy extends HTMLElement {
  [...]
  connectedCallback() {
    [...]
    this.render();
    this.shadowRoot.querySelector('button').addEventListener('click', this.addToCart);
  }
  addToCart() {
    // maybe talk to an api
    this.dispatchEvent(new CustomEvent('blue:basket:changed', {
      bubbles: true,
    }));
  }
  render() {
    if (!this.shadowRoot) {
      this.attachShadow({ mode: 'open' });
    }
    this.shadowRoot.innerHTML = `<button type="button">buy</button>`;
  }
  disconnectedCallback() {
    this.shadowRoot.querySelector('button').removeEventListener('click', this.addToCart);
  }
}
The mini basket can now subscribe to this event on window and get notified when it should refresh its data.
class BlueBasket extends HTMLElement {
  connectedCallback() {
    [...]
    window.addEventListener('blue:basket:changed', this.refresh);
  }
  refresh() {
    // fetch new data and render it
  }
  disconnectedCallback() {
    window.removeEventListener('blue:basket:changed', this.refresh);
  }
}
With this approach the mini basket fragment adds a listener to a DOM element which is outside its scope (window). This should be ok for many applications, but if you are uncomfortable with this you could also implement an approach where the page itself (Team Product) listens to the event and notifies the mini basket by calling refresh() on the DOM element.
// page.js
const $ = document.getElementsByTagName;

$('blue-buy')[0].addEventListener('blue:basket:changed', function() {
  $('blue-basket')[0].refresh();
});
Imperatively calling DOM methods is quite uncommon, but can be found in video element api for example. If possible the use of the declarative approach (attribute change) should be preferred.
Server-side Rendering / Universal Rendering
Custom Elements are great for integrating components inside the browser. But when building a site that is accessible on the web, chances are that initial load performance matters and users will see a white screen until all js frameworks are downloaded and executed. Additionally, it’s good to think about what happens to the site if the JavaScript fails or is blocked. Jeremy Keith explains the importance in his ebook/podcast Resilient Web Design. Therefore the ability to render the core content on the server is key. Sadly the web component spec does not talk about server rendering at all. No JavaScript, no Custom Elements :(
Custom Elements + Server Side Includes = ❤️
To make server rendering work, the previous example is refactored. Each team has their own express server and the render() method of the Custom Element is also accessible via url.
$ curl http://127.0.0.1:3000/blue-buy?sku=t_porsche
<button type="button">buy for 66,00 €</button>
The Custom Element tag name is used as the path name - attributes become query parameters. Now there is a way to server-render the content of every component. In combination with the <blue-buy>-Custom Elements something that is quite close to a Universal Web Component is achieved:
<blue-buy sku="t_porsche">
  <!--#include virtual="/blue-buy?sku=t_porsche" -->
</blue-buy>
The #include comment is part of Server Side Includes, which is a feature that is available in most web servers. Yes, it’s the same technique used back in the days to embed the current date on our web sites. There are also a few alternative techniques like ESI, nodesi, compoxure and tailor, but for our projects SSI has proven itself as a simple and incredibly stable solution.
The #include comment is replaced with the response of /blue-buy?sku=t_porsche before the web server sends the complete page to the browser. The configuration in nginx looks like this:
upstream team_blue {
  server team_blue:3001;
}
upstream team_green {
  server team_green:3002;
}
upstream team_red {
  server team_red:3003;
}

server {
  listen 3000;
  ssi on;

  location /blue {
    proxy_pass  http://team_blue;
  }
  location /green {
    proxy_pass  http://team_green;
  }
  location /red {
    proxy_pass  http://team_red;
  }
  location / {
    proxy_pass  http://team_red;
  }
}
The directive ssi: on; enables the SSI feature and an upstream and location block is added for every team to ensure that all urls which start with /blue will be routed to the correct application (team_blue:3001). In addition the / route is mapped to team red, which is controlling the homepage / product page.
This animation shows the tractor store in a browser which has JavaScript disabled.
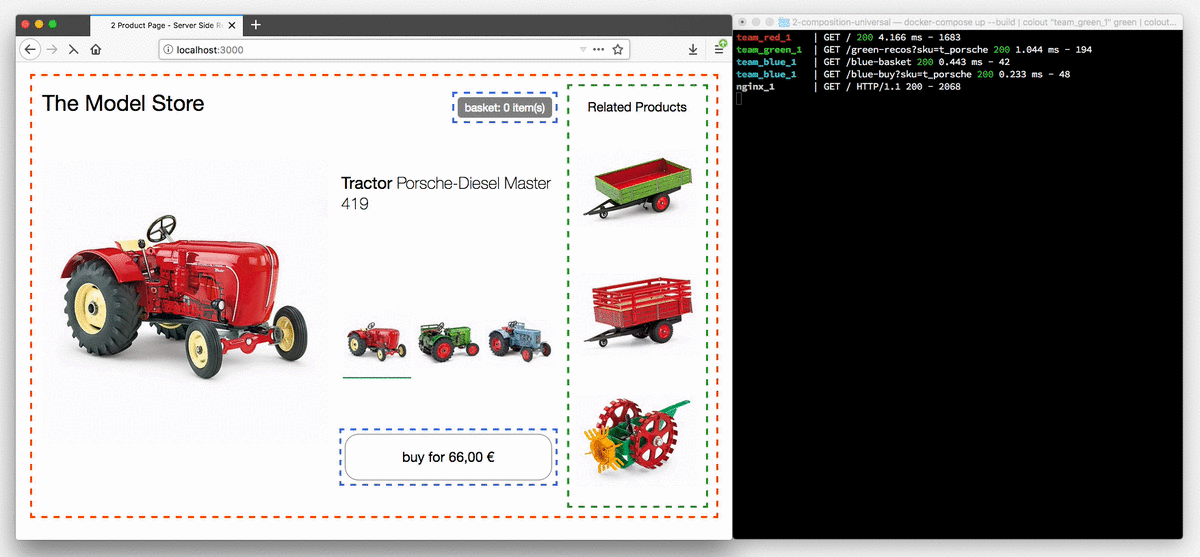
The variant selection buttons now are actual links and every click leads to a reload of the page. The terminal on the right illustrates the process of how a request for a page is routed to team red, which controls the product page and after that the markup is supplemented by the fragments from team blue and green.
When switching JavaScript back on, only the server log messages for the first request will be visible. All subsequent tractor changes are handled client side, just like in the first example. In a later example the product data will be extracted from the JavaScript and loaded via a REST api as needed.
You can play with this sample code on your local machine. Only Docker Compose needs to be installed.
git clone https://github.com/neuland/micro-frontends.git
cd micro-frontends/2-composition-universal
docker-compose up --build
Docker then starts the nginx on port 3000 and builds the node.js image for each team. When you open http://127.0.0.1:3000/ in your browser you should see a red tractor. The combined log of docker-compose makes it easy to see what is going on in the network. Sadly there is no way to control the output color, so you have to endure the fact that team blue might be highlighted in green :)
The src files are mapped into the individual containers and the node application will restart when you make a code change. Changing the nginx.conf requires a restart of docker-compose in order to have an effect. So feel free to fiddle around and give feedback.
Data Fetching & Loading States
A downside of the SSI/ESI approach is, that the slowest fragment determines the response time of the whole page.
So it’s good when the response of a fragment can be cached.
For fragments that are expensive to produce and hard to cache it’s often a good idea to exclude them from the initial render.
They can be loaded asynchronously in the browser.
In our example the green-recos fragment, that shows personalized recommendations is a candidate for this.
One possible solution would be that team red just skips the SSI Include.
Before
<green-recos sku="t_porsche">
  <!--#include virtual="/green-recos?sku=t_porsche" -->
</green-recos>
After
<green-recos sku="t_porsche"></green-recos>
Important Side-note: Custom Elements cannot be self-closing, so writing <green-recos sku="t_porsche" /> would not work correctly.
The rendering only takes place in the browser. But, as can be seen in the animation, this change has now introduced a substantial reflow of the page. The recommendation area is initially blank. Team greens JavaScript is loaded and executed. The API call for fetching the personalized recommendation is made. The recommendation markup is rendered and the associated images are requested. The fragment now needs more space and pushes the layout of the page.
There are different options to avoid an annoying reflow like this. Team red, which controls the page, could fixate the recommendation containers height. On a responsive website its often tricky to determine the height, because it could differ for different screen sizes. But the more important issue is, that this kind of inter-team agreement creates a tight coupling between team red and green. If team green wants to introduce an additional sub-headline in the reco element, it would have to coordinate with team red on the new height. Both teams would have to rollout their changes simultaneously to avoid a broken layout.
A better way is to use a technique called Skeleton Screens.
Team red leaves the green-recos SSI Include in the markup.
In addition team green changes the server-side render method of its fragment so that it produces a schematic version of the content.
The skeleton markup can reuse parts of the real content’s layout styles.
This way it reserves the needed space and the fill-in of the actual content does not lead to a jump.
Skeleton screens are also very useful for client rendering. When your custom element is inserted into the DOM due to a user action it could instantly render the skeleton until the data it needs from the server has arrived.
Even on an attribute change like for the variant select you can decide to switch to skeleton view until the new data arrives. This ways the user gets an indication that something is going on in the fragment. But when your endpoint responds quickly a short skeleton flicker between the old and new data could also be annoying. Preserving the old data or using intelligent timeouts can help. So use this technique wisely and try to get user feedback.
Need More Examples?
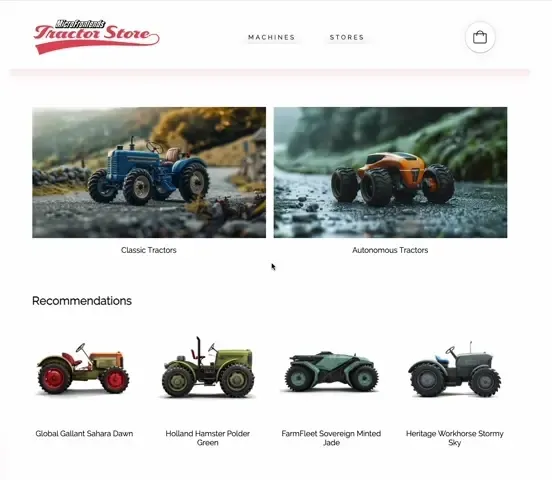
Check out the Tractor Store 2.0
It’s a more real-world micro frontends example that includes challenges like routing & navigation, communication, handling state, loading strategies, sharing code, asset optimizations and testing. The site is a collection of different tech-specific implementations of the same application. Think of it as a TodoMVC for micro frontends.
Additional Resources
- Book: Micro Frontends in Action Written by me.
- Talk: Micro Frontends - MicroCPH, Copenhagen 2019 (Slides) The Nitty Gritty Details or Frontend, Backend, 🌈 Happyend
- Talk: Micro Frontends - Web Rebels, Oslo 2018 (Slides) Think Smaller, Avoid the Monolith, ❤️the Backend
- Slides: Micro Frontends - JSUnconf.eu 2017
- Talk: Break Up With Your Frontend Monolith - JS Kongress 2017 Elisabeth Engel talks about implementing Micro Frontends at gutefrage.net
- Article: Micro Frontends Article by Cam Jackson on Martin Fowlers Blog
- Post: Micro frontends - a microservice approach to front-end web development Tom Söderlund explains the core concept and provides links on this topic
- Post: Microservices to Micro-Frontends Sandeep Jain summarizes the key principals behind microservices and micro frontends
- Link Collection: Micro Frontends by Elisabeth Engel extensive list of posts, talks, tools and other resources on this topic
- Awesome Micro Frontends a curated list of links by Christian Ulbrich 🕶
- Custom Elements Everywhere Making sure frameworks and custom elements can be BFFs
- Tractors are purchasable at manufactum.com :)
This store is developed by two teams using the here described techniques.
Contributors
- Koike Takayuki who translated the site to Japanese.
- Jorge Beltrán who translated the site to Spanish.
- Bruno Carneiro who translated the site to Portuguese.
- Soobin Bak who translated the site to Korean.
- Sergei Babin who translated the site to Russian.
- Shiwei Yang who translated the site to Chinese.
- Riccardo Moschetti who translated the site to Italian.
- Dominik Czechowski who translated the site to Polish.
- John Adib who translated the site to Persian.
- Mehmet Mutlu who translated the site to Turkish.
This site is generated by Github Pages. Its source can be found at neuland/micro-frontends.